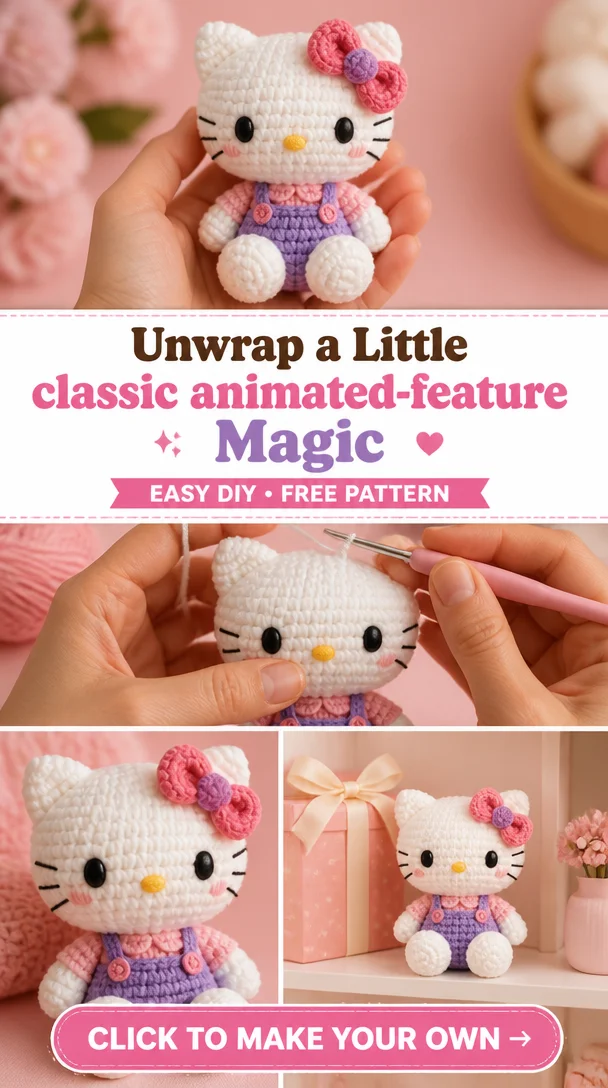
Unwrap a Little Disney Magic
In the world of crochet, few characters evoke as much joy and nostalgia as Hello Kitty. This Hello Kitty crochet project, titled "Unwrap a Little Disney Magic," invites crafters of all skill levels to create an adorable amigurumi representation of the iconic character. With her charming simplicity and kawaii appeal, Hello Kitty makes for a delightful addition to any collection. Crocheting this lovable character is not only a great way to relax but also a perfect opportunity to create unique handmade gifts for friends and family. Whether used as a decorative piece, a collectible charm, or a sweet companion, this Hello Kitty crochet doll is sure to bring happiness to anyone who encounters it. Ideal for beginner to advanced crafters alike, this pattern is one that can be cherished for years to come.
Hello Kitty Crochet Pattern Overview
- Skill Level: Beginner to Intermediate
- Finished Size: Approximately 6 inches tall
- Crochet Hook Size: 3.5 mm (US E)
- Yarn Type: Acrylic yarn
- Yarn Weight: Medium (Worsted)
- Main Colors: White, pink, and black
- Construction Method: Worked in rounds
- Approximate Completion Time: 4-6 hours
- Project Type: Amigurumi doll
Materials You’ll Need
- Worsted weight acrylic yarn in white, pink, and black
- 3.5 mm (US E) crochet hook
- Yarn needle for weaving in ends
- Stitch markers
- Safety eyes
- Scissors
- Stuffing material
Crochet Abbreviations
- MR = magic ring
- ch = chain
- sc = single crochet
- dc = double crochet
- sl st = slip stitch
- inc = increase
- dec = decrease
- rep = repeat
Before You Start
Before diving into this charming project, ensure you’re familiar with working in continuous rounds. Using a stitch marker to track the beginning of your rounds will help maintain an even shape. Keep your yarn tension consistent, and don’t forget to check your stitch counts regularly to avoid any surprises later on. As you create separate pieces like the head, body, and ears, remember to plan how you’ll assemble them later on for the best visual impact.
Free Hello Kitty Crochet Pattern
Foundation (or Magic Ring)
Round 1: Create a magic ring, work 6 sc into the ring.
Round 2: Inc in each st around (12).
Round 3: [Sc in next st, inc in next st] repeat around (18).
Round 4: [Sc in next 2 st, inc in next st] repeat around (24).
Head
Round 5: [Sc in next 3 st, inc in next st] repeat around (30).
Round 6: Sc in each st around (30).
Continue in rounds until the head reaches about 4 inches tall.
Body
Attach yarn to the bottom of the head and repeat similar shaping as the head, working down for about 5 rounds to form the body.
Ears (Make 2)
Round 1: MR, work 4 sc in the ring.
Round 2: Sc in each st around (4).
Fasten off, leaving a long tail for sewing.
Arms (Make 2)
Round 1: MR, work 6 sc in the ring.
Round 2: Repeat Round 2 for 2 more rounds.
Fasten off, leaving a long tail.
Legs (Make 2)
Round 1: MR, work 6 sc in the ring.
Round 2: Inc in each st around (12).
Work 3 more rounds in sc before fastening off.
Facial Details
Attach safety eyes and embroider a small nose with black thread. Add three stitches for the whiskers on each side.
Bow
Using pink yarn, create a simple bow by chaining 10, then working back in sc, fold and secure with a small stitch.
Stuffing and Shaping
Stuff each part with your stuffing material as you complete them, ensuring they hold their shape well.
Joining the Pieces
Using a yarn needle, sew the ears to the top of the head, then attach the arms to the sides of the body. Position the legs at the bottom, making sure everything is aligned properly.
Finishing Details
Weave in all loose ends and ensure everything is securely attached. Optionally, you can add a bit more detail with embroidery to personalize your Hello Kitty.
How to Use Your Hello Kitty Crochet Project
This adorable Hello Kitty crochet doll is perfect for various uses. It can be a delightful decorative piece for your home or a thoughtful handmade gift for a friend. Add it to your backpack as a cute charm or use it as a charming keychain accessory. It also serves as a unique collectible that fans of Hello Kitty will adore.
Tips for a Better Result
- Maintain even tension throughout your stitches for a neat finish.
- Keep an eye on your stuffing to ensure it’s not overly visible.
- When joining pieces, take your time to align them correctly for a polished look.
Customization Ideas
Consider experimenting with different yarn colors to give your Hello Kitty a unique twist. You might also try making variations of her bow or outfit, adding personalized embroidered details, or even creating larger versions by adjusting the pattern proportionately.
Common Problems and Troubleshooting
If you find uneven stitch counts, double-check your work in the early rounds and adjust as needed. For loose stitches, try using a smaller hook to keep everything snug. If pieces are misaligned, take the time to gently adjust and secure them into place.
Care and Safety
For keeping your Hello Kitty crochet doll in good condition, follow the cleaning instructions based on the yarn manufacturer’s recommendations. Be mindful of small detachable parts like safety eyes, especially if the item will be around younger children.
Frequently Asked Questions
-
Is this Hello Kitty crochet pattern beginner-friendly?
Yes, it’s suitable for both beginners and intermediate crocheters. -
What yarn is best for this crochet project?
Medium-weight acrylic yarn works best for this pattern. -
How long does it take to crochet this design?
Approximately 4-6 hours, depending on your skill level. -
Can I make this crochet project larger or smaller?
Adjusting the hook size and yarn can change the overall size. -
How do I attach the bow?
Simply wrap it around the head or secure it at the desired position with a few stitches. -
Can I use different yarn colors?
Absolutely! Feel free to customize with colors of your choice. -
How do I keep the finished crochet doll in shape?
Regularly check stitching and stuffing to maintain the doll’s shape.
Conclusion
Creating this Hello Kitty crochet project is a wonderful way to express your creativity while crafting a piece filled with character and charm. With its appealing design and potential for personalization, this Hello Kitty doll not only makes a delightful addition to your collection but also serves as a heartfelt gift that any recipient will cherish.
SEO Title: Create Your Own Adorable Hello Kitty Crochet Doll
Meta Description: Discover how to crochet your own adorable Hello Kitty using our easy-to-follow pattern. Perfect for gifts, collectibles, and more!
URL Slug: hello-kitty-crochet-pattern
Primary Keyword: Hello Kitty crochet pattern
Secondary Keywords: free Hello Kitty crochet pattern, Hello Kitty amigurumi, cute crochet project, handmade crochet doll
Image 1 Alt Text: Completed Hello Kitty crochet doll in pastel colors
Image 2 Alt Text: A step-by-step guide to creating Hello Kitty’s bow
Leave a Reply