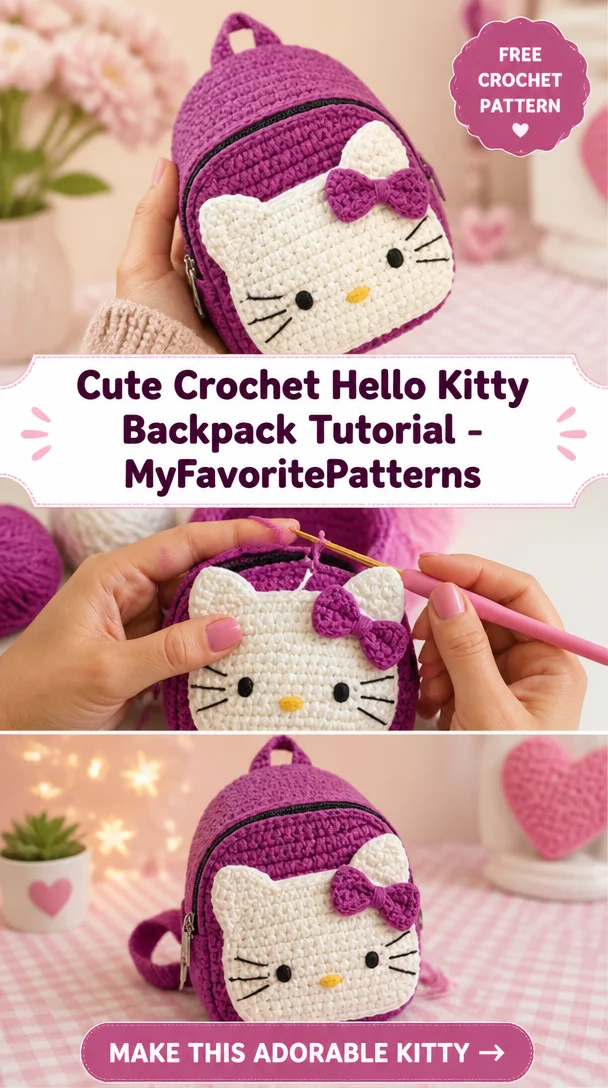
Cute Crochet Hello Kitty Backpack Tutorial – MyFavoritePatterns
Welcome to the whimsical world of crochet with our Cute Crochet Hello Kitty Backpack Tutorial! This delightful project brings the beloved character of Hello Kitty to life in a stylish and functional backpack. Perfectly appealing to fans of all ages, this crochet design not only showcases the charm of Hello Kitty but also adds a touch of kawaii to your accessory collection. Crocheting this backpack is an enjoyable way to express your creativity, whether you’re making it for yourself, as a collectible, or gifting it to a special friend. Suitable for both beginner and experienced crocheters, this project will surely enchant anyone who adores handcrafted items.
Hello Kitty Crochet Pattern Overview
- Skill Level: Beginner to Intermediate
- Finished Size: Approximately 10 inches tall
- Crochet Hook Size: 4.0 mm (G)
- Yarn Type: Cotton or Acrylic
- Yarn Weight: Worsted
- Main Colors: White, pink, black, and yellow
- Construction Method: Worked in rows and rounds
- Approximate Completion Time: 3-5 hours
- Type of Finished Crochet Item: Backpack
Materials You’ll Need
- Yarn in the main colors (white, pink, black, yellow)
- 4.0 mm (G) crochet hook
- Yarn needle
- Stitch markers
- Scissors
- Safety eyes
- Stuffing (optional, depending on design)
- Keychain hardware (if making a small version)
- Bag straps
Crochet Abbreviations
- MR = magic ring
- ch = chain
- sc = single crochet
- hdc = half double crochet
- dc = double crochet
- sl st = slip stitch
- inc = increase
- dec = decrease
- st = stitch
- rep = repeat
- BLO = back loop only
- FLO = front loop only
Before You Start
Before diving into your project, it’s essential to set up some groundwork for a successful crochet experience. Start by working with a stitch marker to keep track of your rounds, especially when working in continuous rounds. Maintain an even tension in your crocheting to ensure a consistent look, and double-check stitch counts after each round to avoid any mistakes. If your design includes color changes, plan your transitions in advance for a seamless finish.
Free Hello Kitty Crochet Pattern
Foundation or Magic Ring
Start by creating a magic ring to form the base for your backpack.
Backpack Body
Round 1: Make 6 sc into the magic ring.
Round 2: Inc in each st around (12 sts).
Round 3: [Sc in next st, inc in next st] repeat around (18 sts).
Continue to increase and work in rounds until the backpack reaches your desired height.
Flap and Closure
To create the flap, work in rows.
Row 1: Ch and turn, sc in each st until the end of the row.
Row 2: Ch and turn, hdc in each st until the end of the row.
Joining the Pieces
Once you have completed all sections, join them using a yarn needle. This includes attaching the flap to the main body of the backpack.
Facial Features and Decorative Details
For the signature Hello Kitty look, you’ll need to add her facial features.
- Sew on safety eyes.
- Embroider a small triangular nose and whiskers using black embroidery thread.
- Attach a cute bow on one side of the head.
How to Use Your Hello Kitty Crochet Project
Your finished Hello Kitty backpack can serve multiple purposes. Use it as a unique accessory for day-to-day outings, a playful bag at school, or even a charming décor piece in your room. It also makes a thoughtful handmade gift for friends and family who appreciate kawaii culture.
Tips for a Better Result
To ensure a polished finished product, focus on maintaining even tension while crocheting small pieces. This will help avoid any gaps or unevenness in your project. When attaching facial features, take the time to position them symmetrically for a more appealing look.
Customization Ideas
Feel free to customize your Hello Kitty backpack with different yarn colors that reflect your personality! Add a personalized touch by varying the size or experimenting with different bow designs and accessories.
Common Problems and Troubleshooting
If you encounter issues like uneven stitches or misaligned pieces, take a step back and check your stitch count after every round. When working with small pieces, it’s normal for them to be fiddly, so take your time to ensure proper shaping and alignment.
Care and Safety
Remember that the care of your crochet project will depend on the yarn used. Always refer to the manufacturer’s washing instructions. For safety, ensure any detachable parts or accessories are securely attached, especially if they are intended for young children.
Frequently Asked Questions
-
Is this Hello Kitty crochet pattern beginner-friendly?
Yes, suitable for beginners with basic crochet skills. -
What yarn is best for this crochet project?
Cotton and acrylic yarns work well for structure and comfort. -
How long does it take to crochet this design?
Approximately 3-5 hours, depending on your sewing speed. -
Can I make this crochet project larger or smaller?
Yes, adjust your starting chain or round count based on desired size. -
How do I attach the bow?
Use a yarn needle to sew it securely to the head of Hello Kitty.
Conclusion
The Cute Crochet Hello Kitty Backpack Tutorial is a delightful project that combines creativity with functionality. With its adorable design and practical use, it’s perfect for fans and crafters alike. So grab your yarn and crochet hook, and get started on your own Hello Kitty backpack today!
SEO Title: Adorable Hello Kitty Crochet Backpack Pattern
Meta Description: Discover how to create a cute crochet Hello Kitty backpack with our easy-to-follow tutorial. Perfect for gifts or personal use!
URL Slug: hello-kitty-crochet-backpack
Primary Keyword: Hello Kitty crochet backpack pattern
Secondary Keywords: Hello Kitty crochet pattern, cute crochet project, kawaii crochet pattern, Hello Kitty amigurumi, crochet gift ideas
Image 1 Alt Text: Finished Hello Kitty crochet backpack in vibrant colors.
Image 2 Alt Text: Close-up of Hello Kitty’s facial features and bow on backpack.